Tooth design for a TempShell (LabDesign)
To create the tooth setup for a TempShell:
On the Design your case action card in the treatment line, click Start.
To proceed with a case for which the design was started, but not completely finished, click Continue.
For a new case, the design module is opened in wizard mode. If you resume designing, the expert mode is launched.
On all implant positions, implant replicas are visualized and virtual dies are added on top.
The wizard will guide you through the following steps:
1. Correct pre-op model placement
This page of the wizard is only shown if the tooth setup request from DTX Studio™ Implant contains a diagnostic wax-up or the SmartSetup. In DTX Studio™ Implant this is shown as a pre-op model.
You should not change its position. Just click Next.
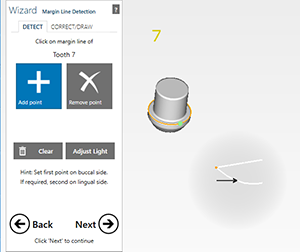
2. Margin line detection of the virtual dies
Virtual temporary abutments are placed onto the planned implant positions to simulate virtual dies onto which the TempShell will fit. The exact shape of this virtual die is not important, as it is merely used as an aid during design, and has no influence on the shape of the TempShell. The margin line of the virtual die will be suggested with an orange line. If required, correct or draw the line. Do this for all the virtual dies.

3. Crown bottoms
The inside of the crown will not be used for calculating the TempShell and will not be shared with DTX Studio™ Implant. Click Next.
Edit the dental cast for immediate extraction cases
In case of immediate extraction of a tooth, you might need to adapt the dental scan:
Click Expert  .
.
Click on the dental scan to select it.
In the dock menu choose Scan Data Editor to trim the model.
Delete and close holes as necessary. When finished, click OK.
Choose Free-form scan data to free-form the scan data. When finished, click OK.
These adapted scan data will be sent to DTX Studio™ Implant when you share the LabDesign.
Click Wizard  .
.
4. Copy tooth
Optionally, copy or mirror the shapes of the teeth in the current jaw scan as a reference for the missing teeth.
5. Tooth placement
For a multi-unit restoration, on the Correction tab, select whether to Move, Rotate or Scale the designed tooth. Alternatively, in Move mode, use the shortcut keys [Ctrl] to rotate and [Shift] to scale the teeth. Select Move all simultaneously to apply your corrections to all the designed teeth. For more information, see Tooth placement (for multiple teeth) and Place model tooth (for a single restoration).
6. Generate crowns
The design module will automatically extend the design to fit on the virtual die.
7. Free-forming
Fine-tune the shape of the tooth; see Free-forming.
The design is adaptable to the soft tissue, the approximals (adjacent teeth), and to the antagonist (if available). On the Adapt tab, for a Pontic, click Adapt to Gingiva. Enter the desired distance to the soft tissue and select whether or not the pontic has to be pulled down to the soft tissue. If an antagonist has been added to the design, choose the desired distance for the Occlusal to remove the tooth from occlusion, and click Cut intersections.
 |
For the Approximals, do not use Cut intersection and Shape-preserving adaptation. Use the other free-forming options instead. |
8. Adapt to pre-operative model
This page of the wizard is only shown if the tooth setup request from DTX Studio™ Implant contains a diagnostic wax-up or the SmartSetup (transferred into a pre-op model in DTX Studio™ Lab; see Adapt to pre-op scan) or if a healthy tooth was copied or mirrored as pre-op model (see Copy tooth).
Check the Exclude selected parts and use the brush tool to indicate parts that should not be adapted. Click Adapt tooth models. The design will slowly adapt itself to the pre-op model. Click Stop once the adaptation has evolved sufficiently.
9. Shrinking
For a TempShell, shrinking can be used.
10. Free-forming
After the shrinking step, further free-form the design.
11. Connectors
Design the connectors.
12. Merge and save restorations
In the last step, merge and save the restorations. Select I'm done and click Next.
 |
Do not use the free-forming options for the merged restoration. |
