Shrinking
Reduce the anatomic shapes in order to create the framework of the anatomic copings. Note that we are talking about cutback for applying veneering material here such as ceramic.
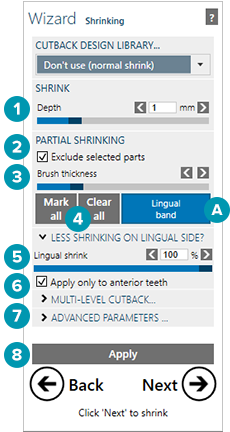
The Depth slider [1] controls the amount of cutback — that is, the thickness of the ceramic layer you plan to apply on the framework.
Note that the minimal thickness will always be enforced, which means that in areas where the material thickness does not allow it, the cutback will be less than what is specified by [1].


Partial shrinking

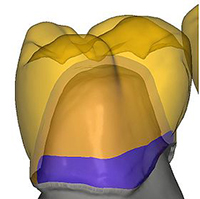
You may exclude certain parts from shrinking so that they are kept in full anatomic shape. This is useful e.g. for creating lingual bands, or for designing a metal chewing surface if you do not have enough space for ceramic on the occlusal side. Select Exclude selected parts [2]. The teeth turn yellow and become responsive to mouse actions. Use the mouse button and 'paint' on the teeth to mark areas that will be excluded from the shrinking, or hold down [Shift] to erase.
The Brush thickness slider [3] controls the circumference of the brush used for marking.
Mark all units or clear them all by clicking Mark all / Clear all [4].
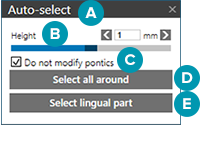
To add a lingual or a full band, click on Lingual or Full band [A] which will open a new dialog.
Height [B] — Choose the amount of height for the band.
Select all around [D] and Select lingual parts [E] — Choose a lingual band only or a band that encompasses the whole unit.
Tip
There is no width for the lingual band, because the tooth is placed in the correct position. The contour and emergence profile is calculated from there, making the process more productive, instead of a random position of height and width and contour.
In some cases, it may be beneficial to have less reduction on the lingual side. This result can be achieved by setting the Lingual shrink slider [5] to a value below 100%. If you have set, for example, a depth of 1 mm [1], and set [5] to 60%, then the shrinking will be just 0.6 mm on the lingual side. By default, this lowered value is only applied to anterior teeth. To apply it to all teeth, clear the Apply only to anterior teeth [6] check box.
Cutback design library: There are different types of cutback libraries:
Facial-ridges: Reduce the tooth with ridges on the facial side.
Incisal-ridges: The incisal edge remains untouched. The incisal-ridges affect the facial and incisal side.
Thimble: Design a thimble crown implant bridge (available for In-lab products and Nobel Biocare Implant Bridges).
Retention: Design an implant bridge type wrap around (available for In-lab products).
Note
The cutback libraries are not able to adjust automatically to a shape with added material, but the cutback libraries will be cropped automatically where material is removed in the previous free-form step.
Multi-level cutback: After you have shrunk a restoration, you can re-shrink the restoration: Choose other parameters, click Multi-level cutback and select Re-shrink reduced shape. Select Exclude selected parts to mark areas you want to exclude from the shrinking operation. Then click Apply.
To change the minimum thickness of the framework, use Minimize thickness under Advanced parameters [7], within the margins defined for the selected material. Changing the Bottom shrink depth allows you to specify a different shrink depth for the bottom side of the pontic teeth.
Click Apply [8] to perform the shrinking without switching to the next wizard dialog, or click Next to shrink and move on.