Tooth placement
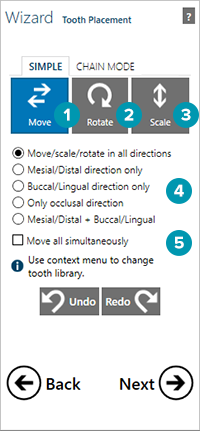
The software will load library teeth and place them automatically. Optimize the placement of the library teeth manually by moving, rotating, and scaling. Switch between these modes using the placement correction [1-3] buttons. Then, drag and drop the teeth to make your adjustments.


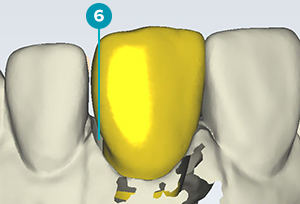
For crown preparations, do not be overly concerned about positioning accuracy at this point – a rough placement will be enough. You can always fine-tune later in the free-forming step. It does not matter if the model tooth does not properly fit the preparation (see [6] for an example) – as long as the tooth model is positioned somewhat reasonably in relation to the preparation, the software will adapt the library tooth automatically in the next step.
Tip
A semi-transparent display of the library teeth might help you see both the prepared tooth and the library tooth, thus facilitating accurate placement. Right-click Anatomic shapes in the Show/Hide group dialog to toggle transparency for all library teeth.
Keyboard shortcuts
Instead of using the mouse for switching between modes [1-3], you can use shortcuts to switch modes.
| Key | Action |
| Ctrl | Switch to rotation. |
| Shift | Switch to scaling. |
Note that whenever shortcuts are available, they will be displayed in a tooltip for the respective button. So, in this case, hover the mouse over Move, Rotate or Scale [1], and a help bubble will appear, which reminds you of the available shortcuts.
When placing teeth from the tooth library, it may be helpful to visualize intersection with the antagonists, if you have performed an antagonist scan. Click/Touch Show distances in the CAD menu. See Visualize contacts and occlusions.
Restricting movements
In some cases, it may be useful to restrict possible movements to certain directions. Especially novice users who are not yet used to navigation in virtual 3D space, will appreciate the options [4] to limit movements/scaling to:
Mesial/distal direction only
Buccal/lingual direction only
Occlusal direction ('up and down') only
Mesial/distal and buccal/lingual direction only ('move to all sides, but keep height')
Moving all teeth simultaneously
Move all teeth at the same time by selecting the Move all simultaneously check box [5]. This is useful, for example, when all teeth are positioned too low or too high in the software's initial setup suggestion. When done with the adjustments, click Next to proceed. The model teeth will then be adapted to the preparations.
Choosing a different tooth indication
To replace a tooth indication with another (e.g., to put a premolar-shaped tooth on a molar preparation, due to space restrictions):
Right-click the tooth to replace.
Select Load custom tooth model.
Select a tooth type.
Chain mode
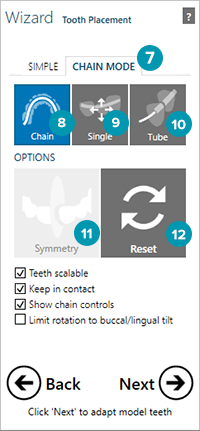
Chain mode [7] facilitates the setup of large bridges.

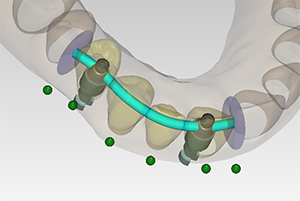
The chain mode is represented by a light blue chain, green control points and purple disks that mark the ends of the chain. There are three different chain modes:
Chain [8]: To transform all teeth in a chain. Click any point in the dental arch, and drag your mouse to move the whole dental arch in a chain. Click a disk to fix its position. The control point for the disk will turn red. Now you can click and drag the chain at any point without changing the position of the pinned disk. To pin a tooth on its position, click on its green control point. It then becomes red.
In order to avoid the teeth becoming scaled, clear the Teeth scalable check box. By default, the teeth always stay in contact while doing transformations. To create gaps between the teeth when stretching the chain, clear the Keep in contact check box. To hide the control points, clear the Show chain controls check box.
Click and drag to move parts of the chain. Use Ctrl to rotate parts of the chain. Use Shift to scale parts of the chain.
Rotation actions can be limited to buccal/lingual direction (by selecting Limit rotation to buccal/lingual tilt).
Single [9]: In the single mode, moving or rotating a tooth does not directly influence the placement of the adjacent teeth. Moving or rotating a tooth may only change the position of the adjacents, as they all remain in contact in the chain. The single mode allows you to fine-tweak the tooth placement on single teeth.
Tube [10]: When working in tube mode, it is recommend to release (unlock) all tooth positions. Use Ctrl + Shift to pin or release all teeth. Now you can move all the teeth on a fixed bow, called the 'tube'. This allows you to correct the center line if all teeth have already been placed.
The Symmetry button [11] actually consists of four buttons:
The upper-left button creates an overall symmetry from the patient's right side to the left side.
The upper-right button creates an overall symmetry from left to right.
The lower-right button creates a front teeth symmetry from left to right.
The lower-left button creates a front teeth symmetry from right to left.
Control points appear blue for teeth that will be considered in the symmetry mode. When moving anterior teeth in symmetry mode, the position of the posteriors can be influenced too, if they are not locked into position. In single mode, each tooth transformation will be mirrored along the symmetry plane.
Note
As long as the control point for the symmetry plane is green (not locked), the plane may change its position within the dental arch.
The Reset button [12] allows you to reset the placement in different ways:
Reset all teeth between unpinned teeth
Reset everything, but keep changes made in Simple tab
Reset everything to the initial tooth placement
