Free-forming
Anatomical free-forming
Click and drag on the tooth to change its shape.
During free-forming, it is very useful to visualize distances to antagonists or adjacents; see Visualize contacts and occlusions for details.
See Keyboard shortcuts design module for the available specific free-form keyboard shortcuts.
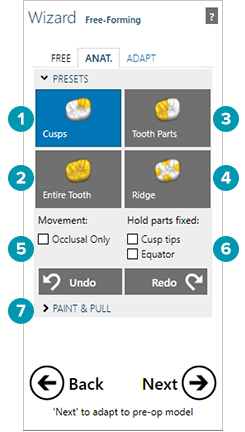
Click Cusps, Entire Tooth, Tooth Parts and Ridge [1]-[4] to change the area that you are editing:
| Button | Description |
| Cusps [1] | Edit individual cusps. Note that this only works properly for restorations based on library teeth (anatomic crowns/copings, etc.). For offset copings or wax-ups, the software cannot know the location of the cusp. |
| Entire Tooth [2] | Edit the entire tooth. Hold down [Ctrl] to switch to rotation, [Shift] to switch to scaling. This way, rotate or scale the tooth, while it remains attached to the preparation margin. As always, the software will remind you of the available keyboard shortcuts if you hover the mouse over the respective button [2]. |
| Tooth Parts [3] | Edit the mesial, distal, buccal, lingual side — wherever you click. Useful e.g., for adjusting approximal contacts. |
| Ridge [4] | For fine-tuning of ridges/bulges. |
Tip
It is also possible to drag and drop the bottom of a pontic when in Anatomic forming mode.
There are options that allow you to restrict the movement in certain ways. Use Movement [5] to restrict the movement to the occlusal direction (up/down) only. Use Hold parts fixed [6] to keep certain parts of the tooth fixed: either the cusp tips or the equator.
Tip
A useful example on how to take advantage of this option: To create deeper or flatter fissures, switch to Entire Tooth [2], then select Cusp tips [6]. Drag the fissures to make them more or less pronounced, without overly changing the rest of the tooth shape.
Dynamic reshaping can be done with the Paint & pull [7] options, just like you would do in wax.
Free-forming adjustments
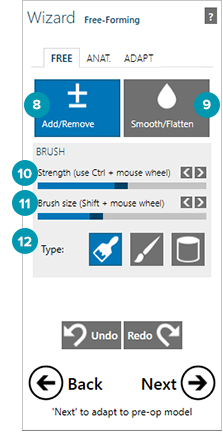
Click the Free tab to switch to the virtual wax knife, which allows you to add or remove material. Toggle between Add/Remove [8] material and Smooth/Flatten [9].
Adding/Removing material
To add or remove material, click the tooth and hold Add/Remove [8]. The longer you hold it, the more material will be added. Hold down [Shift] to remove material.
Smoothing
Activate Smooth/Flatten [9], click and hold the mouse button on the parts you would like to smoothen. Hold down [Shift] to flatten (super-smoothing). Hold down [Ctrl] for a more shape-preserving smoothening.
Adjusting the brush
Use the Strength slider [10] to adjust the speed at which material is added or removed while you hold the mouse button (or the amount of smoothening when in Smooth/Flatten mode). The Brush size slider [11] controls the brush size, that is, the area that is affected around the mouse pointer.
Switch to a different virtual tool using Type [12]. There are three types of brush styles to select from:
Round ball (default)
Pointed, like the point of a knife (useful for carving fissures for example)
Flat end of cylinder
Tip
Use the smoothening option to remove certain artifacts.
Adapting to antagonist/adjacent
Adapting to occlusion and adjacent (proximal)
Adapt the restoration to the antagonist (if scanned), and to the adjacent teeth.
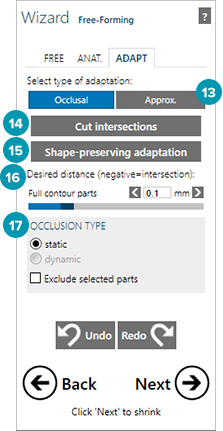
Define a desired distance to the antagonist (for anatomic and reduced parts) using the Desired distance slider(s) [16].
For the actual adaptation, choose between a smart Shape-preserving adaptation [15], which will try to preserve the tooth morphology, or Cut intersections [14], which will cut intersections with the antagonist.
To adapt to anterior teeth, switch to Approximal [13].
Tip
Use a combination of both: first the Shape-preserving adaptation [15], which will keep small intersections, and then Cut intersections [14].
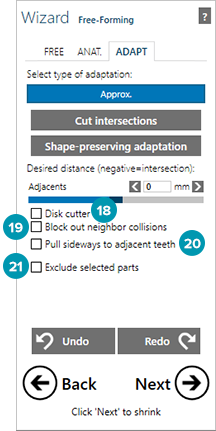
If Disk cutter [18] is selected, two disks are placed at each end of the restoration, aligned with the insertion axis of each tooth. These can be used to create flat areas in the region of the approximal contact points. Hold the left mouse button on a disk to change its position. Use the blue arrows to tilt the disk in two directions. Add one or more disks by clicking the Add disk button. Delete disks with the left and right mouse button, or use the Remove all button to remove all disks. Hold the Shift key to set the control point of a disk to a desired position on the scan surface. With Ctrl and Shift you set the center control point of the disk to a desired position and the software will set the disk parallel to the surface where the point has been set. This way you can define the approximal contact points. Using the blue arrows you can tilt the disks to create a flat interproximal region which ensures a proper insertion of the restoration. Use the Disk thickness to apply a gap to the approximal contact points. Now, click Cut intersections to cut the flat areas on the restoration.
If you select Block out neighbor collisions [19] and then click Cut intersections, the undercuts on the adjacents will be blocked out while respecting the path of insertion for the restoration. The interproximal regions will be adapted to this blocked out area.
If Pull sideways to adjacent teeth [20] is selected, the teeth will be adapted even if there is no contact prior to adaptation.
If Exclude selected parts is selected [21], the selected parts will not be adapted.
When done, click Next.
Adapting pontics to the gingiva
Use the Adapt tab to adapt pontics to the gingiva.
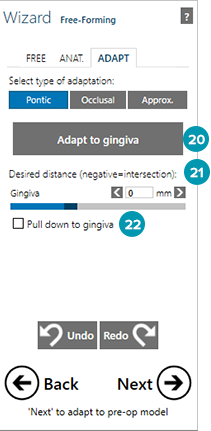
The Desired distance [21] slider controls the distance to the gingiva after the adaptation:
A negative value means that the pontic will intersect the gingiva scan (that is, the physical pontic will apply pressure on the gingiva).
A positive value means that there will be a gap between gingiva and pontic.
A zero value (default) means that the pontic will be in direct contact with the gingiva.
Tip
Select Pull down to gingiva [22] if the gingiva is so low that the pontic does not intersect it to begin with. This will pull down the pontic towards the gingiva during the adaptation. This check box will be disabled in the diagnostic CAD workflow. Alternatively, pull the pontics down to the gingiva manually by dragging on the bottom while the Anat. (Anatomic) tab is active.
The ridge-lap position of the pontic is controlled during the placement of the pontic shape.
When designing reduced pontics, the Free-forming dialog will appear twice, once before and once after the reduction. It is therefore your choice whether to perform the pontic adaptation on the full anatomic or on the reduced shape. To make sure that the exact Desired distance value [21] is respected in the final restoration, perform the adaptation after the reduction.
Finally, click Adapt to gingiva [20] to perform the actual adaptation.
