Virtual gingiva
For implant bridges and in-lab restorations, the soft tissue can be designed digitally.
After the first free-forming step, you are prompted to design the restoration with or without gingiva.
Click Design virtual gingiva [1] on the Virtual Wax-up Bottom page.
To skip the design of the virtual gingiva, click No gingiva design.
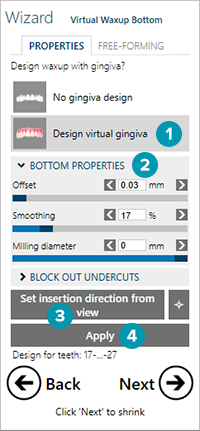
Click Bottom properties [2] to unfold the gingiva's bottom properties:
Offset: Creates a gap between the jaw scan and the gingiva bottom.
Smoothing: Fills out edgy cavities.
Milling diameter: Adds a tool radius compensation for the tool used to mill the gingiva area
Before you start blocking out, choose an insertion direction. On screw-retained restorations the insertion direction is by default the average of the implant angulations. On cement-retained restorations it is by default the insertion direction of the bridge crowns. If necessary, adjust the view. Click Set insertion direction from view [3]. To verify, click View from insertion direction [ ]. Then click Apply.
The light blue mesh displays the blocked out surface. You can still change the surface by modifying the parameters and clicking Update [4]. To clear and reset the settings, click Clear.
Use the Free-forming tab to block out manually certain areas. Here you can add and remove material (see free-forming). Removing material is only possible on blocked-out undercuts and might recreate undercuts. The depth of the undercuts will be visualized with a color scale. When you are done, click Next.
Draw the gingiva margin line (see define emergence profile). Add as many points as required to design the border of the gingiva area. Double-click to finish drawing the margin line. After the gingiva has been calculated, it is still possible to correct the margin line. Add points with the left mouse button. Remove points with the left and right mouse button. Click Apply to recompute the changes.
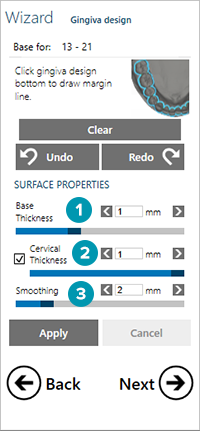
The gingiva design shape can be influenced using several parameters. You can change the thickness of the base [1], the cervical border thickness around the teeth [2] and smoothing of the surface [3]. Click Apply to confirm.
Click Clear to restart from scratch. When you are done, click Next.
The gingiva free-forming tool differs slightly from the free-forming tool for crowns and bridges. The anatomical free-forming mode only provides two different options. The default small region option allows you to move smaller parts of the gingiva, whereas huge region allows you to move major areas.
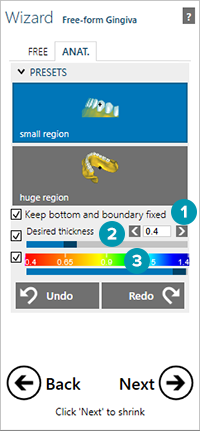
When moving bigger areas, bottom and boundaries are fixed by default. If you clear this option [1] the bottom and boundaries will also be moved. When you change the desired thickness of the gingiva [2], the new thickness is only applied to the area that is modified and not to the entire gingiva. Furthermore, the thickness can be visualized with an adjustable color scale [3].
Click the Free tab to access the free-forming mode. Here you can add, remove or smoothen material with different brush types, adjustable in size and strength. This tool can be used for the final touches. Click Next.
Proceed with the shrinking step. Click Next.
Proceed with the free-forming step.
In Expert mode you can reduce the gingiva. Select Shrink Gingiva Design Part in the dock menu. Enter the desired depth of shrinking. By default, Auto select gingiva is activated. This option automatically excludes the frame's lingual part and the frame's intersecting parts with the teeth from being shrunk.
Going back to Wizard mode, will bring you back to the free-forming step. Click Next.
There are two cross-section shapes that might be useful for connectors for this kind of restoration:
The tooth-to-tooth connector shape (  ) joins tooth shapes by using the existing tooth geometry. By default, this connector shape ignores the minimum cross-section area.
Deleting all the connectors ( ) as for the virtual wax-up with gingiva all the teeth are connected by the gingiva.
Click Apply cross-section / shape change. Click Next.
The restoration is merged. This step might take some time, as several operations need to be computed. Click Next.
Free-form the merged restorations. Click Next.
Design the screw holes. Click Next.