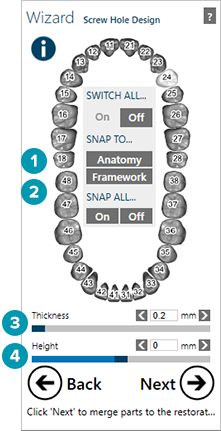
Screw hole design
Design the screw channel for an On1 crown or a Universal Base crown that will be milled in the lab. It is advisable to extend the screw channel above the Universal Base framework. This will prevent the ceramic from flowing into the screw channel holes and the milling burr from chipping the ceramic.
Click Anatomy [1] or Framework [2] to set a global default for the screw channel. Set the screw channel Thickness [3] and Height [4] by typing a value or by adjusting the slider for these parameters. Height values above zero make the screw channel higher than the anatomy; values below zero shrink the screw channel lower than the anatomy.
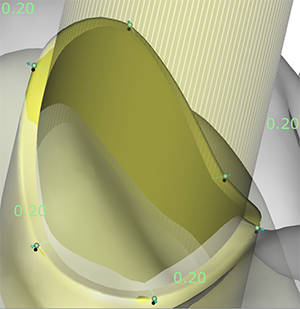
Adjusting the screw channel
The screw channel has control points [2] with toggle disks [1]. Adjusting the screw channel control points can override the height and thickness parameters, but the minimum thickness of the channel will always be applied. If the toggle disks below the control points have a black border, the control points are fixed in their height to the anatomy.
To change the thickness individually and selectively to one or more control points, click on the arrow by the control point, hold the mouse button and drag it outside, away from the center, to your preferred value. To increase the thickness in one direction, e.g. mesial/distal/oral/vestibular, click on the arrow which you define as the center of range movement at the control point, hold [Shift] and drag the part of the screw channel to the desired thickness.
Note
If you want the same thickness all around the screw channel, click an arrow at the control point, hold [Ctrl] and drag the border of the screw channel outwards.
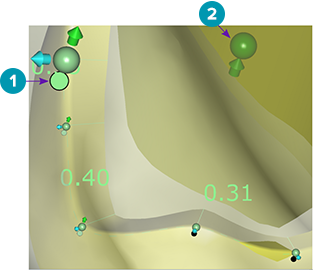
Switch to free movement mode by clicking the toggle disk. The color switches from black-bordered to green [1]. Now you can move this control point in all directions; only the minimal thickness will remain fixed.
The control point [2] in the middle of the screw channel allows for movements in the up/down direction. This is only available for control points in free movement mode.
To unlock all control points, choose a locked control point and hold [Ctrl] while clicking the toggle disk. Now all points change to free movement mode. You can now individually lift them to any height by dragging the green point in the middle of the screw channel.
Notes
Press [Ctrl] + [Shift] and click the green control point in the middle of the screw channel to flatten the top of the screw channel.
Get a summary of all available commands by holding the mouse cursor over the ![]() in the wizard window on the left upper edge.
in the wizard window on the left upper edge.