Scan instructions
 |
Important Make sure to calibrate the scanner before using it for the first time. |
To place an object on the model holder, please remove the model holder from the scanner table before placing objects in it. This will prevent forcing the height and tilt motors.
General
You are free to scan the objects in the order of your choice.
The model holder plate has magnets on he undersurface for ease in removing and positioning back into the scanner. The model is securely fixed in position on the model holder with the aid of a sure-grip screw.
The scan tasks can be started from the KaVo LS 3 scanner touch panel or from within the DTX Studio™ Lab scan module.
Scanning screw-retained restorations
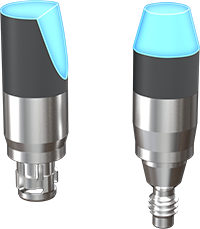
Locators
Although you can freely choose the order in which objects are scanned, for a screw-retained restoration it is recommended to start with the locators:
Optionally, remove the soft tissue from the model.
Note
If the soft tissue is hindering the seating of the locators, the soft tissue should be removed from the model.
Place the locators in the jaw model. Make sure to use the correct locators and check whether the locators are correctly seated.
Place the model on the model holder with the anterior teeth facing towards the sure-grip screw.
If the locators are very close to each other, scan them separately:
On the tasks panel, select the locators to scan next.
Click Scan to scan the selected locators.
When the scan task is finished, the scanned locators are marked by a check mark. Select the locators to scan next.
Repeat steps 2 and 3 until all locators have been scanned.
After scanning, check in the 3D view whether the top surface and the upper part of the locator (the truncated cone) have been scanned properly. To add scan data to a locator, select which locator to scan, rotate the 3D view to indicate in which angle to scan, and click Rescan zone.

Jaws
If the locators have been scanned correctly, remove the locators and place the soft tissue on the model. If the model or soft tissue material is made of reflective material it is recommended to lightly coat the surface with a CAD spray.
Indicate locators
Perform the Indicate locators  step before you close the scan module. Otherwise, scan data will be lost and when you reopen the scan module you will no longer be able to indicate the locator positions. The locator positions step automatically aligns the locator scan data with the locator library.
Scanning cement-retained restorations
Dies
Select the dies you want to scan. The dies can be scanned in the model or in a die holder. To scan the dies in the holder, you can place the dies randomly (the software will detect which dies are being scanned), but the dies have to be placed centrally in a circle on the holder.
If the dies are very close to each other, scan them separately to avoid shades on the margin lines.
On the tasks panel, select the dies to scan next.
Click Scan to scan the selected dies.
When the scan task is finished, the scanned dies are marked by a check mark. Select the dies to scan next.
Repeat steps 2 and 3 until all dies have been scanned.
Note
Dies that are scanned together will appear as one object in the 3D scene. They can be cut into separate die models with the help of the indicate tooth wizard.
After scanning, check the quality of the scan in the 3D view.
Click Check alignment  to check the alignment of the die scan with the jaw scan.
Scanning jaws in occlusion
If in the scan setup you selected to scan both jaws, the occlusion scan is added automatically to the scan tasks.
First scan both jaws separately. The scan data of the antagonist will be placed at a certain distance from the first jaw in the 3D viewer.
Then scan the jaws in occlusion. Choose one of the following options:
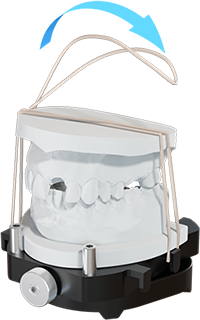
Elastic bands: to scan the jaws in occlusion without articulator or fixator. Place the lower model in the model holder and align the upper model in occlusion to the lower model. Once both jaws are correctly positioned, fix the set of models on the model holder using elastic bands (please cross bands over to secure). Use the lateral hooks on the model holder to secure the elastic bands. Make sure to fix the models tightly.

Articulator: to scan models mounted in an articulator. Select the type of articulator. The selected articulator is saved as the new default articulator for your account on your computer. When you click Start, the platform will go down so you can place the articulator. Make sure that the articulator jaws face the inside of the scanner.
After scanning the models in the articulator, you will be asked to turn the articulator 180° around its axis and to scan the occlusion once more.
When you select another scan task, a warning will be shown to remind you to take out the articulator or fixator before the height of the scan platform is adjusted to the new scan task.
Scanning a wax-up
Make sure to fill any holes in the wax-up with modeling wax in order to get smooth results in the design module.
Scanning an occlusal rim
Place the restoration jaw with the occlusal rim in the scanner.
When scanning an occlusion, select Diagnostics/occlusal rim placed on model to indicate that the diagnostics and/or the occlusal rims are placed on top of the jaw. Make sure you place all the diagnostics and occlusal rims on the jaw.
Notes
This checkbox is only shown if an occlusal rim or diagnostic is present in the scan setup.
In the design module the occlusal rim is called the 'bite rim'.
If there is an occlusal rim for the antagonist, make sure to place the rim on the jaw when scanning the antagonist.