| 1 |
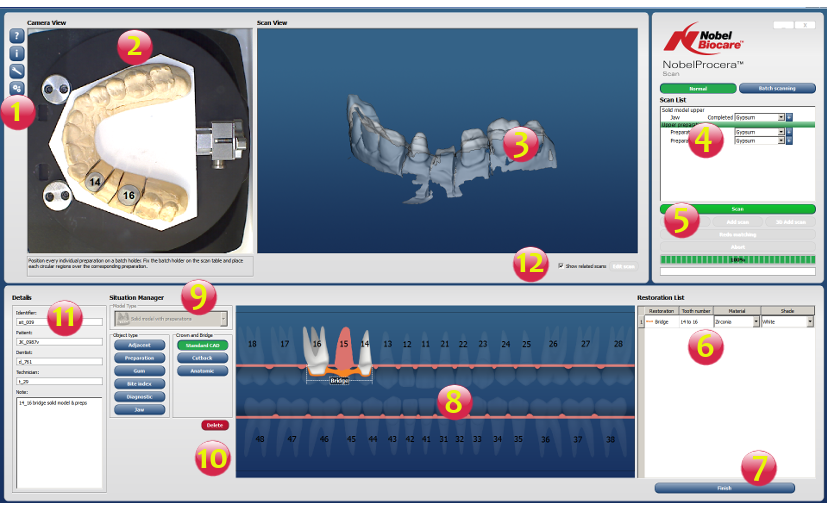
Preferences, Maintenance panel and Help buttons |
The Maintenance Panel is where the calibration and
calibration check can be performed, or where camera options are
set. From the preferences panel set the language, mouse and 3D
viewer behavior. |
| 2 |
Camera view |
Shows what the camera sees. Circular hotspots and other
shapes are used here to define the regions to scan. |
| 3 |
Mesh (3D) window |
Shows the scanning results. |
| 4 |
Scan list |
Lists the scanning steps and the related objects needed to
achieve a complete model scan. |
| 5 |
Scan
and scan improvement actions buttons |
Used to launch the basic scan action and other scan
improvement actions. See also Improvement Options. |
| 6 |
Restoration list |
Lists objects of the model that require restoration settings
like shade and material. |
| 7 |
Finish
button |
Saves scan results in a situation file. |
| 8 |
Situation Manager's designer window (dental schema) |
Shows a tooth chart where objects are added and defined, in
order to reflect faithfully what the situation
represents. |
| 9 |
Situation Manager's object type buttons |
Used to define the scanned objects, crown or bridge design,
abutment and bar. |
| 10 |
Implant type selector and Delete button |
Used to define the implant type from a list shown with this
button. Once the Delete button is clicked the design is in
delete mode. |
| 11 |
Personnel and patient information |
Contains names, required to finish the situation. |
| 12 |
Edit scan button |
Opens the Mesh Edition Tools to edit the scan. |