The Mesh Edition Tools are used to modify the scan of an object that bears holes, bumps or excess material.
 |
|
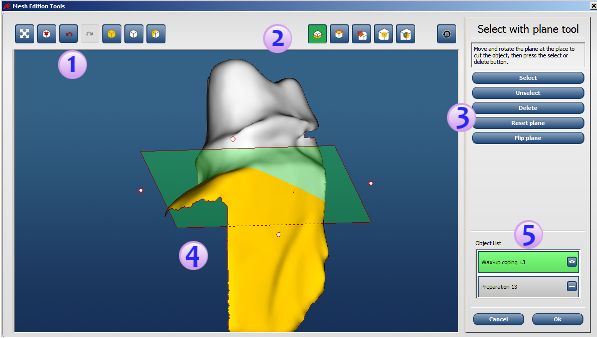
| 1 | Delete, Recenter, Select action buttons |
| 2 | Mesh Edition Tools toggle buttons |
| 3 | Select flip and delete action buttons |
| 4 | Main 3D mesh window |
| 5 | Object list |
To access the Mesh Edition tools, click the Edit scan button.
The Mesh Edition Tools are available only for scans of the following objects:
- Wax-up bridge
- Wax-up coping
- Wax-up abutment
- Bite index
- Overdenture bar
- Intaglio
- Diagnostic
- PIB frame
- Gum
- Adjacent teeth
- Jaw scans (abutments and implant bridge)
In some cases, it is easier and faster to edit an incomplete or bad scan rather than rescanning the object. Several tools are available to correct different types of imperfections on certain types of objects.
- The Surface Removal tool
 can be used to remove bumps and imperfections
from the scan. It can also be used the remove the model from the scan of the
overdenture or to trim excess material located on a bite index
can be used to remove bumps and imperfections
from the scan. It can also be used the remove the model from the scan of the
overdenture or to trim excess material located on a bite index - The Plane Trimming tool
 can be used to remove part of the scan that is
not useful. Remember, the larger the scan, the more time the CAD module will
take to process information. The Plane Trimming tool can be used to remove
the scan of the scanning table or to remove floating areas.
can be used to remove part of the scan that is
not useful. Remember, the larger the scan, the more time the CAD module will
take to process information. The Plane Trimming tool can be used to remove
the scan of the scanning table or to remove floating areas. - The Volume Removal tool
 can be used to remove any object accidentally
scanned that is not required or to remove floating areas.
can be used to remove any object accidentally
scanned that is not required or to remove floating areas. - The Hole Filling tool
 can be used to fill holes that were not
corrected by the automatic hole filling feature of the system. Using this
tool will allow the user to manually select a hole and have the system fill
it.
can be used to fill holes that were not
corrected by the automatic hole filling feature of the system. Using this
tool will allow the user to manually select a hole and have the system fill
it. - The Partial Hole Filling tool
 can be used to fill empty areas located on the
edge of the scan, or to fill holes that could not be filled using the Hole
Filling tool. For more complex holes, you can use the Partial Hole Filling
tool first to create a more simple hole, and then use the Hole Filling tool
to complete the hole filling.
can be used to fill empty areas located on the
edge of the scan, or to fill holes that could not be filled using the Hole
Filling tool. For more complex holes, you can use the Partial Hole Filling
tool first to create a more simple hole, and then use the Hole Filling tool
to complete the hole filling.
