Abutment design
Control points
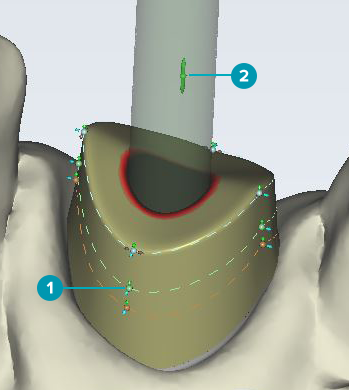
Control points [1] are provided on the abutment which can be moved in, out, up and down to change the abutment's shape.
 |
Note that the software ensures that undercuts are avoided, and production-specific design restrictions are enforced. Therefore, there is intentionally some restriction in the movement, and moving one control point can cause another control point above or below to move as well. |

Use the green control point [2] between the arrows in the center of the abutment, to adjust the overall abutment height.
Tip
For a more complex shape, add additional control points on any line by holding down [Ctrl] and left-clicking on the dotted control line.
Wizard tab: Top
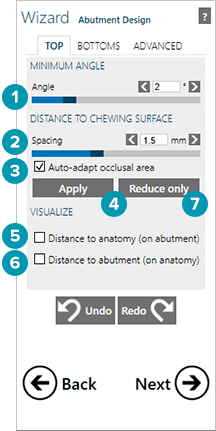
The Angle slider [1] in the wizard enforces a minimum draft angle of the abutment, and it does not allow the abutment to have undercuts. Lower values are easier to design.


Use the Spacing slider [2] to retain a certain space between the anatomy or 'helper crown' and the abutment. Select the Auto-adapt occlusal area check box [3] to precisely offset the distance of the abutment top from the chewing surface.
If a change to Angle [1] or Spacing [2] is entered, these changes will only be applied when either Apply [4] or Reduce only [7] is clicked/tapped. Apply [4] will both reduce and grow the shape in order to reach the desired distance values; Reduce only [7] will only shrink the abutment at the points where the distance to the anatomy is lower than the set value.
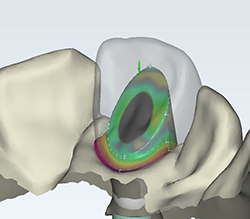
Select Distance to anatomy [5] to visualize the distance between the anatomy to the abutment. The visualization is given on the abutment and is color coded from red which means low distance and blue high distance.
The highest value is set by the Spacing [2] slider.
You can also have a Distance to abutment [6] measurement which visualization is presented on the anatomy.
Wizard tab: Bottoms
Use this tab to correct your abutment bottom design, without going backwards in the wizard. For details see Generate abutment bottoms.
Wizard tab: Advanced
See Generate abutment bottoms - Advanced options for details on how to use the advanced options for the abutment bottoms.

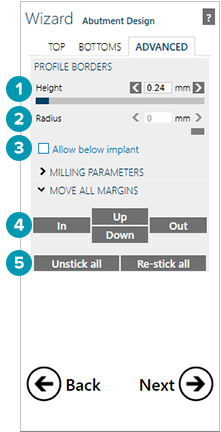
The Height slider [1] sets the minimum height of the abutment profile border.
The Radius slider [2] controls the round off at the sharp edge of the border.
Allow below implant [3] gives you the ability to drag border control points below the surface of the implant.
 |
Use these options very carefully. |
Use In, Out, Up, Down [4] to move all of the points that define the border (abutment margin) simultaneously in, out, up or down.
Use Unstick all and Re-stick all [5] to unstick or re-stick all of the border control points to the soft tissue.