About this task

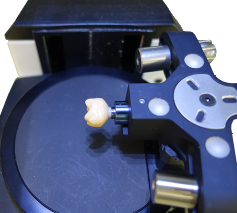
FCZ implant crown wax-up in 2G scanner holder.
Steps
The scanning strategy for the FCZ implant crown wax-up is similar to the one used with the wax-up
abutment.
-
From the Situation manager section of the NobelProcera
Scan module, select and place an implant on
the required unit in the dental schema.
-
Click the Wax-up button of the Crown and Bridge block, then click on the
implant previously created in the dental schema.
Note: You can also draw a PIB on the dental schema and keep only the required unit.
-
Place the FCZ implant crown wax-up in the wax-up holder and fix the holder on the scan table,
on a level plane.
Note: It has been tested and noted that tilting the table to make the occlusal surface more visible helps
to eliminate holes on the occlusal surface, especially for molars.


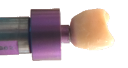
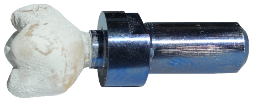
FCZ implant crown wax-ups on replicas.
-
Launch the scan.
Note: The scan list contains a step for each face of the FCZ implant crown wax-up. After the
second step, users can optionally perform Add scan actions, varying tilt angles and
switching holder faces.
-
Follow the instructions to scan face # 1
-
Follow the instructions to scan face # 2
-
Inspect the resulting 3D image. Inspect the areas where deeper features or undercuts may cause
incomplete scanning.
-
Perform Add scan if necessary. Place the holder with the (potentially)
incomplete face up. Tilt the scan table so the camera has a better view on the region to scan.
-
Inspect the resulting mesh. If necessary, repeat Add Scan with alternate face
and varying tilt angle.
Result
The FCZ implant crown wax-up situation is saved. The design of the FCZ implant crown
wax-up is ready to be completed in the
NobelProcera
Abutment
module.