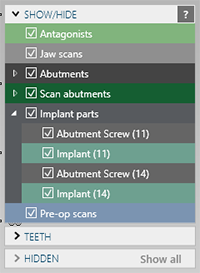
Showing/Hiding objects
The Show/Hide group, as the name suggests, allows you to show or hide objects (like scan data, or parts of the restoration which you have designed), by using the check boxes left of the object or object group. Objects are grouped by type. For a more specific selection, expand a group by clicking on the little arrow left of the check box.

As you proceed with designing your case, the list will become more and more populated.
To set the transparency for a group, right-click a group to open a menu, and select the transparency for the group.
To set the transparency for an item, point to the item in the list, and use the slider that will appear.
Expand the Teeth group to switch visibility on a per-tooth basis. Expand the Hidden group to see what parts are currently hidden. Select the check box next to a hidden object to make it visible again. Click/Tap Show all to show all parts available or hold down the [Alt] key to temporarily show all parts.
Note
The following shortcuts are available:
| Shortcut key | Action |
| Ctrl + wheel button | Hide the clicked object. |
| Shift + wheel button | Make the clicked object transparent. |
| Shift + Ctrl + wheel button | Show the latest hidden object. |
| Show/Hide groups | |||||||
| A | Antagonist | S | Jaw scans | G | Gingiva scans | E | Anatomic parts |
| C | Connectors | W | Wax-up scans | F | Full contour parts | R | Reduced parts |
| P | Pre-op (situ) | V | Virtual gingiva design | I | 2D images | D | DICOM |
| T | Telescopes | O | Other | B | Crown bottoms | M | Merged parts |
| X | Upper jaw (maxillae)* | N | Lower jaw (mandibles)* | ||||
Use the Shift key and one of the above shortcut keys to change the transparency of a group.
* Only available for cases with restorations in both upper and lower jaw